

 |
| This was the picture I originally shared with all of the items that I made. Below I'm going to walk you through each piece. |
Shopping List:
Old Window
Old Piece of Wood
Mason Jars
Picture Frame (cheap!)
Tall bottle (cheap!)
Chalk Finish Paint
Foam Brushes
Paint Brush
Twine
Mini Clothes Pins
Hot Glue Gun
Scrapbook Paper (only 2-4 pieces)
Sharpie
Alright
so these were all of the items I used. Once you read through this post,
you may only need one or two. So many of these things can done with
different items. It's completely up to you! Just about everything listed
craft material wise can be found at Michaels.
 |
| My main pieces that needed to be purchased. An old, weathered piece of wood, and an old window. Both can be found at an antique store :) |
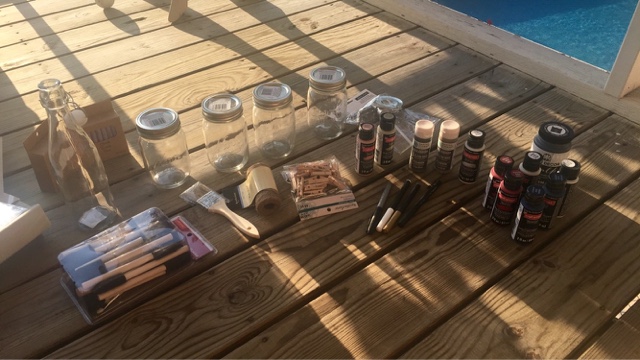 |
| These are the materials I started with. Mason jars, a dollar store bottle, foam brushes, a regular paint brush, twine, small clothes pins, and various colors of chalk finish paint. Everything here (excluding the bottle) was purchased from Michaels :) |
 |
| I'm going to go through one thing at a time. We'll start easy and work our way up! This was another thing I purchased from the dollar store that was not pictured above. Take a dollar store frame (mine was basic brown), remove the glass and set it aside. Grab a bar of soap and rub it all over the frame, especially on the corners and hard edges. Next, choose your desired color of chalk finish paint and paint over the soap, being sure to cover the entire frame. This paint is Martha Stewart, found at Michaels. Now set this aside and grab the glass you removed earlier. I used an old shoe box to keep from making a mess, but anything would work! Set the glass down in the shoe box and paint the glass with one coat of black chalk paint. Wait ONE HOUR (not a minute earlier, trust me... I learned the hard way. It balls up and looks awful and you have to start over.) and do a second coat and set aside. While that is drying, take a piece of sandpaper and lightly rub off the soap from the frame. You will begin to get the distressed look at pictured above. Rub until you get the desired effect. Place your DRY piece of glass that is now chalkboard back into the frame and ta-da! You're done with one piece! |
 |
| This was one of my favorite crafts :) Sorry for the terrible picture, but you can still see. These were simple and so so cute! Starting with one mason jar, find your desired chalk finish color and do one coat. Repeat with the other jars. As mentioned above, wait ONE hour and do a second coat. Once you have two coats on and they are completely dry, grab a piece of sandpaper and begin to rough it up, especially on the hard edges. It looks SO neat. Trust me! After they are distressed, grab a piece of twine and tie around the top. For the tall jar (an old wine bottle would look great as well!) I used a hot glue gun and wrapped the twine. I chose to put flowers in mine for Mother's Day, but since then we have used them at parties for knives, forks, and spoons. So versatile! |
 |
| Here they are with flowers in them :) |
 |
| Doing this for the first time it was difficult, but now that I've learned from mistakes, it's so so easy! This was a SUPER old window, so first of all I painted it white. Next I painted the two panes with chalk paint, same procedure as above. For the other four panes, I used scrapbook paper, cut them the same measurements, and hot glued them on. I added finishing touches of twine and mini clothes pins, to add a cute and crafty look. You can mix this up so many ways! |
 |
| Lastly, and probably my favorite of all was this old piece of wood. I'm not sure how, but it turned out looking neat. I can't wait to do more of these! So to start, I did a white wash on the wood. I had no idea how to do it, so honestly I completely guessed but it paid off. I used a little bit of water mixed with white chalk paint. Acrylic was probably recommended, but I was using what I had. I had already been to Michaels three times in two days and really didn't want to make another trip. I just guessed on amounts and mixed together. Added water if too thick, added paint if too thin. You get it. I did the white wash one night and started painting the next morning. Based on the color, you can decide how many coats you would like. Mine had two. Next, I chose a bible verse that I love, and went for it. Looking back, I probably should have measured or something to make sure it was centered, but I just didn't have the materials. So I guessed, and it didn't turn out too bad :) You can use chalk paint or sharpies. I used both. |
I hope this helped.. at least a little :) Feel free to ask any questions! Enjoy getting crafty on this long weekend.
xoxo
Bailey


0 comments